Here's a vector piece I did in Adobe Illustrator CS4 of one of my dear friends, Madeline. She's beautiful and classy, and I think this piece captures those attributes well. Enjoy!
LogoGirlByDesign
Saturday, August 24, 2013
Wednesday, July 24, 2013
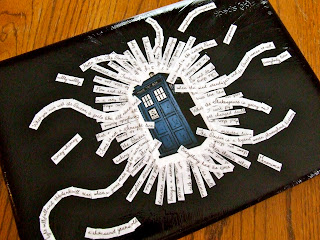
DIY: Doctor Who Computer Cover
To all you Doctor Who fans out there (whovians, if I may), here is a time lord inspired project step-by-step.
You need:
Scissors
Tape
Mod Podge
Craft glue
Paintbrush
Clear nail-polish (or someother kind of sealer)
Print outs of Doctor Who quotes and the Tardis
1. First of all, I started with an old computer case/cover for my macbook. I wouldn't suggest doing this directly onto your computer's surface, but rather purchase a cover (or re-use an old one) to decorate. If it's an old cover, make sure the its clean and smooth, and sand off any rough or peeling pieces.
2. Cut out your quotes and Tardis and design where you want the pieces on the cover. The choice is up to you how its arranged, so don't be afraid to be creative with it :)
5. Finally, seal it. While Mod Podge is a sort of sealer, I would suggest putting something a bit more heavy duty as a final coat for a project like this. For mine, I used clear nail-polish.
I hope you enjoyed this Doctor Who DIY! As you can imagine, you can apply these crafting techniques to other kinds of projects and use other themes.
You need:
Scissors
Tape
Mod Podge
Craft glue
Paintbrush
Clear nail-polish (or someother kind of sealer)
Print outs of Doctor Who quotes and the Tardis
1. First of all, I started with an old computer case/cover for my macbook. I wouldn't suggest doing this directly onto your computer's surface, but rather purchase a cover (or re-use an old one) to decorate. If it's an old cover, make sure the its clean and smooth, and sand off any rough or peeling pieces.
3. Glue down the pieces where you want them making sure to get all the "bubbles" out. Don't be afraid to layer the pieces, just make sure it's all glued down well. Next, seal it over with the Mod Podge. The Mod Podge helps to waterproof the paper into place and give it a glossy finish. There are different kinds you can get (such as glossy, matte, GLITTER, ect...the choice is up to you), but I used glossy for this project.
4. Let it dry. I'd suggest letting it dry for a few hours, maybe a day, just to make sure it has cured well.
I hope you enjoyed this Doctor Who DIY! As you can imagine, you can apply these crafting techniques to other kinds of projects and use other themes.
Something Old, Something New: The Swimsuit Project
Introducing the swimsuit project! Just a heads up, this is not a sewing project for beginners. I've been sewing for 10 or so years now, and this was a challenge....but if you have a good understanding of your body type, find the right material, and are up for the challenge, go for it! The results are quite rewarding. Modest swimsuits are hard to come by, and while I know we each have our own definitions of what we consider a "modest" swimsuit, here's my attempt at modesty with a vintage twist. Enjoy!
For this project, I did not work from a pattern. I used the top part of a formal dress pattern combined with a basic a-line type flare. The swimsuit bottoms I bought at Goodwill, and most of the material I used is vintage swim fabric my grandmother gave me. So something old, something new...and not a penny spent :)
Sunday, June 16, 2013
Treasure Hunt: Yard Sales
A couple weeks ago I had the urge to go yard-saling. I hadn't been in forever! Here are a few of my finds: An antique suitcase (my prized find of the day), a belt, a dessert stand (to be used as a jewelry stand), and a long sequined skirt....all for $10. This could be a new hobby of mine...Goodwill? Great. Yard sales? Even better.
Saturday, June 1, 2013
Graphic Design: TeenPact
I did some graphic design for a student campaign for TeenPact Leadership Schools. TeenPact is where teens (and even pre-teens) can learn about government from a Christian perspective in a hands-on, exciting, challenging way. It's one of the most amazing things I've ever been involved in.
I had the chance to put my graphic design skills to work for a friend of mine from TeenPact. She was attending National Convention and ran for TeenPact Representative. Within the walls of the TeenPact organization, this is a big deal! The students involve run a just about all-out campaign. I designed the graphics for Maddie's campaign, which was perfect practice for me! While I enjoy graphic design all around, I also love politics and would love to do graphic design for political campaigns one day.
I had the chance to put my graphic design skills to work for a friend of mine from TeenPact. She was attending National Convention and ran for TeenPact Representative. Within the walls of the TeenPact organization, this is a big deal! The students involve run a just about all-out campaign. I designed the graphics for Maddie's campaign, which was perfect practice for me! While I enjoy graphic design all around, I also love politics and would love to do graphic design for political campaigns one day.
Subscribe to:
Comments (Atom)


